How to Make Hud Appear Again Csp
Screen customization
The Clip Studio Paint screen is fully customizable. Yous tin both change the organization of buttons and prepare buttons for frequently used functions to ever show on the screen.
Layout Settings
The layout of the bars and buttons in Clip Studio Paint can exist arranged and set in the [Layout Settings] screen.
| Prune Studio Paint'southward interface allows you to salve dissimilar settings depending on whether the device is in vertical or horizontal orientation. |
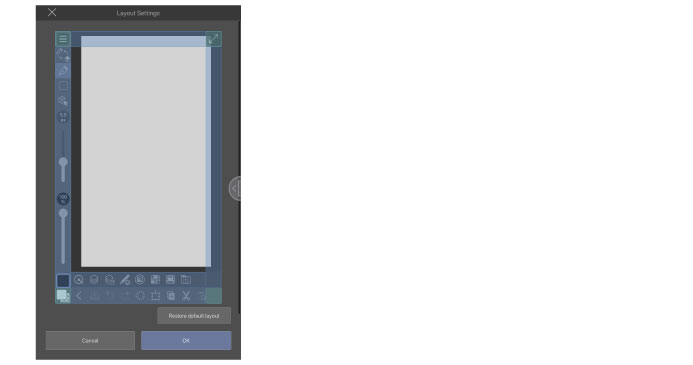
1 Tap [Carte du jour] and select [App Settings] menu > [Layout Settings].
This shows the [Layout Settings] screen, which contains a preview of the Clip Studio Pigment interface.
Frames are displayed at the top, bottom, left, right, and in the four corners of the preview. Bars can exist placed on the height, bottom, left and right frames. Buttons tin exist placed in the iv corner frames.
two Changing the orientation of your device.
The layout of Clip Studio Paint can store different settings in both vertical and horizontal directions. By changing the device's orientation, y'all are able to set a layout that matches its orientation. In this example, the device is set in the vertical direction.
3 Borer the meridian, bottom, left and correct blueish frames will brandish a menu in the center of the screen. From the menu, select the option yous want placed at the position you tapped.
The selected bar is now placed at the tapped position.
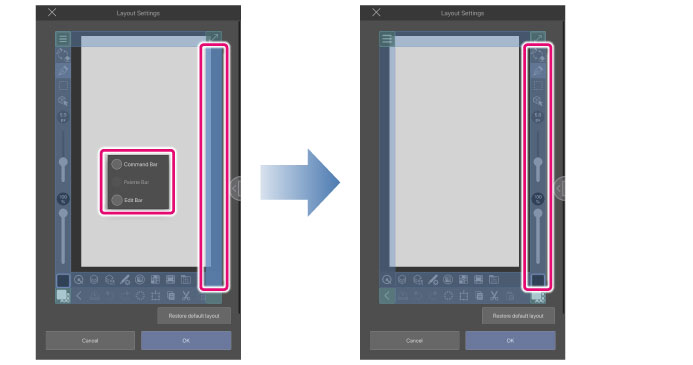
| ·Regardless of orientation, more 1 bar tin exist displayed next to each other on the shortest side of the screen. ·Furthermore, the Palette Bar cannot be placed on the long side of the screen. When arranging confined side by side, they cannot exist placed outside the blue frames. ·If you do not want to alter layout, after the bill of fare is displayed, tap annihilation other than the bill of fare to close it and return to the preview screen. |
4 Tapping the four corner frames will display a card in the centre of the screen. From the menu, select the option yous desire placed at the position you lot tapped.
The selected button is now placed at the tapped position.
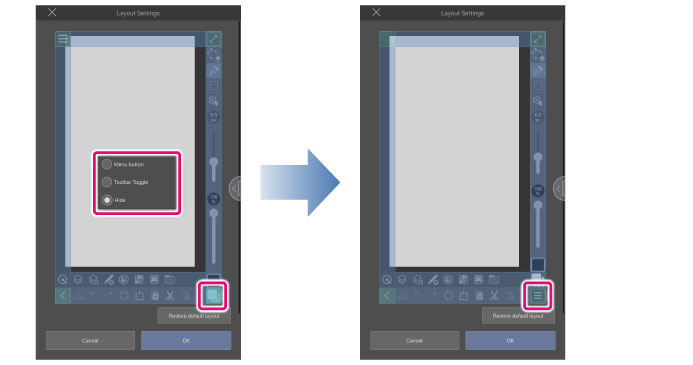
| Menu buttons cannot be hidden. |
v Tap the [OK] button on the bottom right of the screen.
| ·By changing the device's orientation while in Layout Settings, you are able to fix a layout that matches each orientation. Your settings before changing the device's orientation are too retained. ·To return to the initial layout, tap [Restore default layout] on the lower right of the [Layout Settings] screen. |
Palette Bar Settings
The palette bar items can be set from the [Palette Bar Settings] screen.
1 Tap [Menu] and select [App Settings] menu > [Palette Bar Settings].
2 On the [Palette Bar Settings] screen, select the palettes you want on the palette bar.
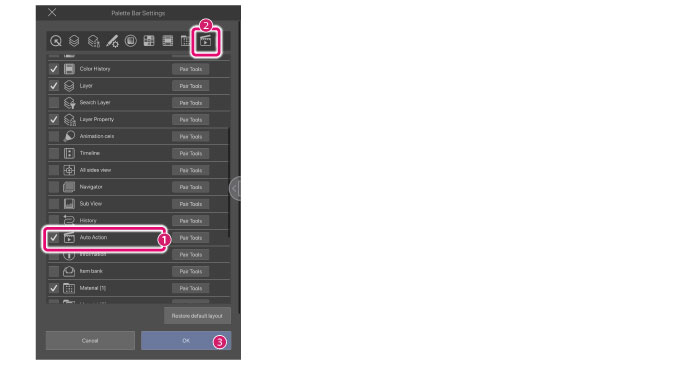
(1) Tap the palette name to select it.
(ii) A palette icon will exist added to the palette bar preview.
(3) Tap [OK].
iii This sets a button for the selected palette to the palette bar currently shown on the height of the screen.

The Palette Bar Settings Screen
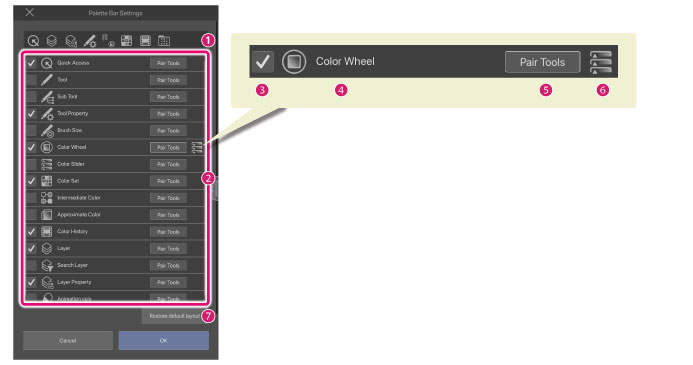
(ane)Preview
This is the settings screen where y'all can see a preview of the Palette Bar. Elevate and lift and driblet the icon across the palette bar to rearrange the display club of the icons.
(two)List
This shows the pallete bar items in a listing. Y'all tin can select a palette that has been added or deleted from the palette bar.
(iii)Show/hibernate icon
Tap to switch between showing and hiding icons.
If the box on the left of the palette name is checked, the palette volition testify on the palette bar.
| A preview of the palette bar settings screen displays at the top of the screen. Drag and elevator and drop the icon across the palette bar to rearrange the display society of the icons. |
(4)Palette Name
This shows the proper name of the palette.
(5)Pair Tools
You lot tin set up more than than one palette to testify simultaneously from one icon in the palette bar.
Borer [Pair Tools] shows the [Pair Tools] screen. Tap the proper name of the palette yous want to testify at the same fourth dimension with the palette you selected to pair with it.
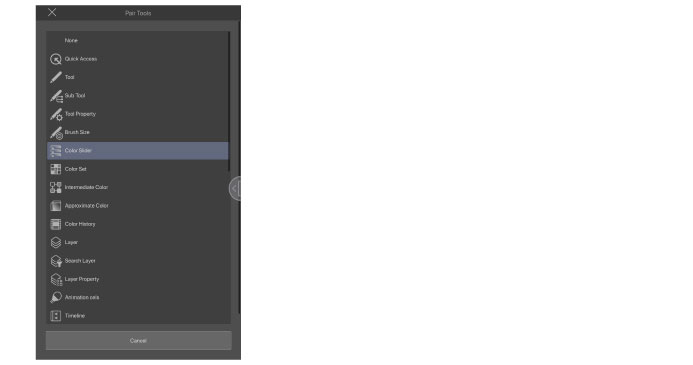
| If yous exercise not want to Pair Tools, tap [Cancel]. |
A paired tool's icon shows both palette icons. Tapping it from the palette bar shows both palettes at the aforementioned time.
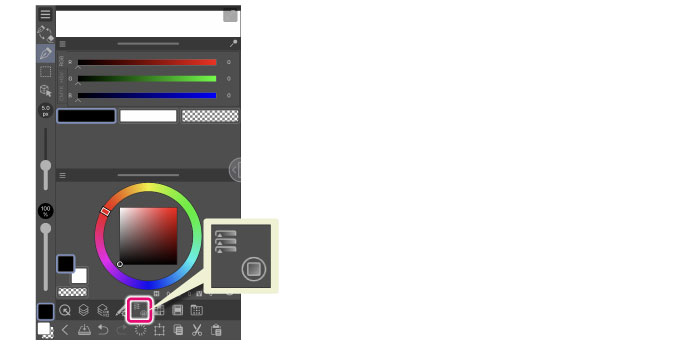
(half-dozen)Set Icon
This icon shows the palette icons of a paired tool.
(seven)Restore default layout
This restores the Palette Bar to its initial state.
Edit Bar Settings
Tap [Menu], and so select the [App Settings] menu > [Edit Bar Settings] to set items displayed on the Edit Bar.
The Palette Bar Settings Screen
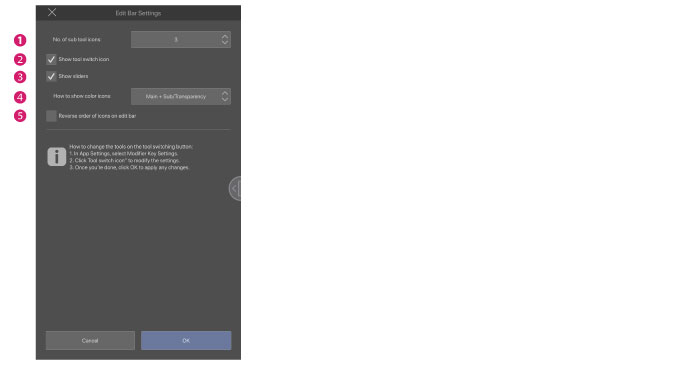
(1)No. of sub tool icons
This sets the number of sub tools that can be displayed in the edit bar.
(two)Testify tool switch icon
This switches betwixt the currently used tool and the eraser.
(three)Show sliders
When turned on, this shows the [Castor Size] and [Opacity] sliders in the edit bar.
If there is not enough space to brandish the slider, tap the [Brush Size] and [Opacity] buttons, and the slider will pop up.
(4)How to show colour icons
This sets how color icons are displayed.
(five)Reverse gild of icons on edit bar
When turned on, this reverses the society of the items on the edit bar.
Command Bar Settings
Tap [Bill of fare], then select the App Settings] carte du jour > [Command Bar Settings] to set items displayed on the Command Bar.
The Command Bar Settings Screen
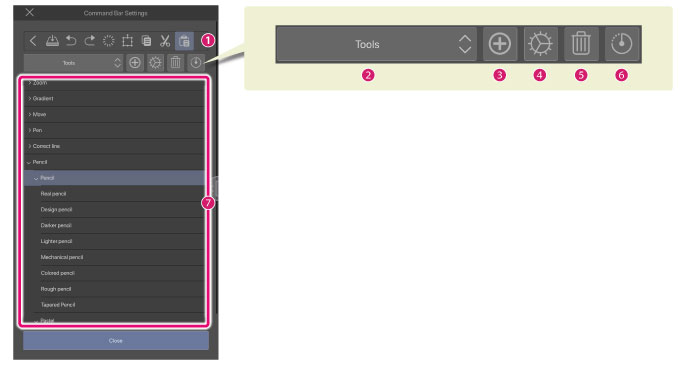
(i)Preview
This is the settings screen where you tin can run into a preview of the Command Bar.
Elevate and drop the icons in the preview to change their social club.
·If your screen is in a vertical orientation, drag and lift and drib the icon horizontally across the command bar to rearrange the display order of the icons.
·If your screen is in a horizontal orientation, elevate and elevator and driblet the icon vertically along the command bar to rearrange the display order of the icons.
(2)Categories
Select the category of the function you want to add to the Command Bar.
| Principal bill of fare | The list's brandish will switch to the Chief menu. |
| Options | The list brandish will switch to optional content. Optional content consists of functions and operations that are not included in the menu and tools. |
| Tool | The list will switch to the side by side tool. |
| Machine activeness | The list will switch to the next auto action. |
| Drawing colour | This shows the [Colour settings] screen and allows you to select a color. Later on selecting a color, an icon of that color is added to a list. You can select a colour from that list as well. |
(three)Add
This adds the selected detail in the listing to the Command Bar.
·If the icons are arranged horizontally, they will be added to the correct of the icon selected in the preview.
·If the icons are bundled vertically, they will be added below the icon selected in the preview.
| If you set besides many icons on the command bar and they do not fit on the screen, yous can swipe it to run into the subconscious icons. |
(4)Settings
This sets the icons arranged in the preview. Displayed items may vary depending on the selected contents.
| Chief menu | This shows the [Icon settings] screen. For details on the [Icon settings] dialog, see "Icon settings dialog ". |
| Options | This shows the [Icon settings] screen. For details on the [Icon settings] dialog, run into "Icon settings dialog ". |
| Tool | This shows the [Settings of sub tool] screen. For details on the [Settings of sub tool] dialog box, see "Sub tool settings dialog ". |
| Car action | This shows the [Icon settings] screen. For details on the [Icon settings] screen, see "Icon settings dialog ". |
| Cartoon color | This shows the [Name Settings] screen. For details on the [Name Settings] dialog box, run across "Proper noun settings dialog ". |
(5)Delete
This deletes icons from the command bar preview.
(6)List
Shows the [Selected area] function list. From hither you can add functions to the [Control Bar]. If [>] is displayed before the item name, double tap it to brandish the lower hierarchy.
(7)Restore default layout
This restores the command bar to its initial state.
| Images and background colors gear up for each icon are maintained fifty-fifty later deletion. |
Source: https://www.clip-studio.com/site/gd_en/csp/userguide/csp_userguide/860_phone/860_phone_customize.htm
0 Response to "How to Make Hud Appear Again Csp"
Post a Comment